I’ve never been big on holiday outfits or decorations. But when I got back into line dancing and saw a few of the gals wearing Halloween shirts and jewelry the first week of October, I couldn’t resist joining in.
Nothing I saw shopping in-person and online was quite what I wanted. Instead, so, I decided to make two Halloween shirts using heat transfer vinyl (HTV) and my Cricut machine.
Halloween HTV Shirts
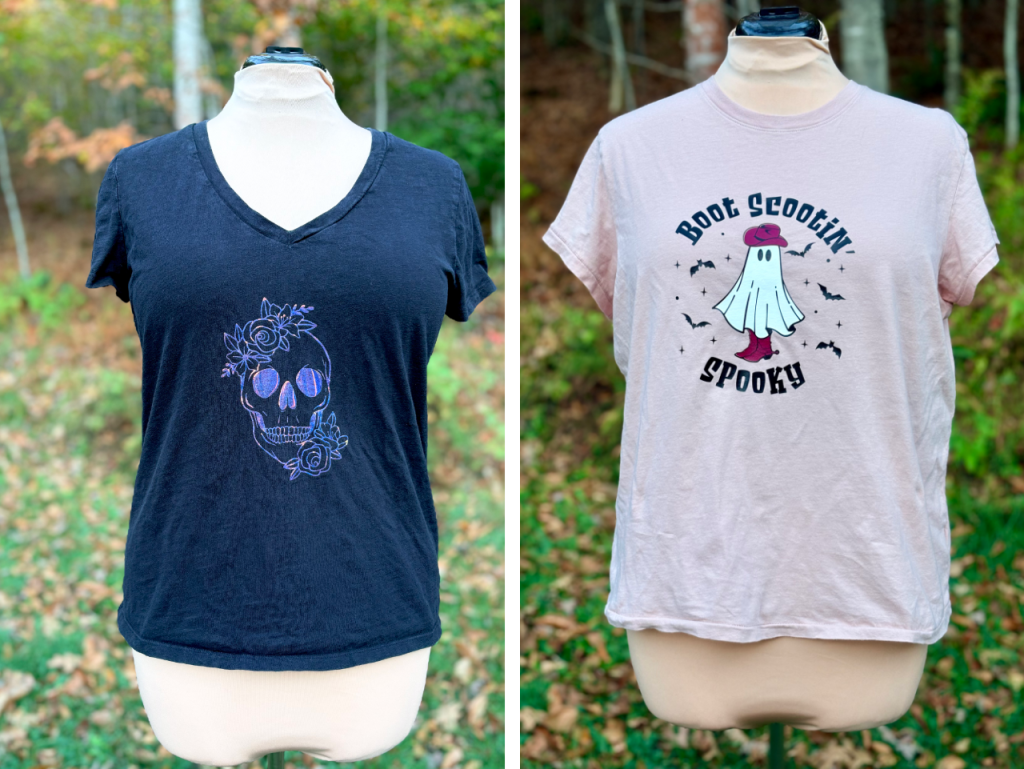
A few months back, I’d picked up a roll of holographic HTV, so I pulled out my Cricut and found the perfect skull design on Etsy for an old black cotton tee from Target.
The Boot Scootin’ Spooky design also came from Etsy. It’s a more complex SVG file, so to make it work, I had to simplify the image in Illustrator and prepare it for cutting across three HTV colors: maroon, white, and black. I retraced the sheet, boots, and hat pieces to create cohesive layers, making them slightly oversized so the black outlines would overlap the edges. I also removed fine details that would be too tricky to weed or might shift during application, and replaced the text using the free font Scream Zombie, which I thought was a bit more Halloween-ey. I’d forgotten how much I love working in Illustrator.
Since this was my first time layering HTV, I followed some tutorials that discussed adding registration marks and using heat-resistant tape to ensure alignment without affecting the shirt. I added stars in the corners, which also helped with alignment. Wish I’d taken pictures while in progress, but maybe next time!
There are a couple of places where the bottom layer either shrank or where the black shifted a bit when I applied the final layer, because I can see the t-shirt poking through. Honestly, though, I kinda like how that looks, stylistically, so I wasn’t disappointed; I’m super pleased with the outcome.
Direct to Fabric
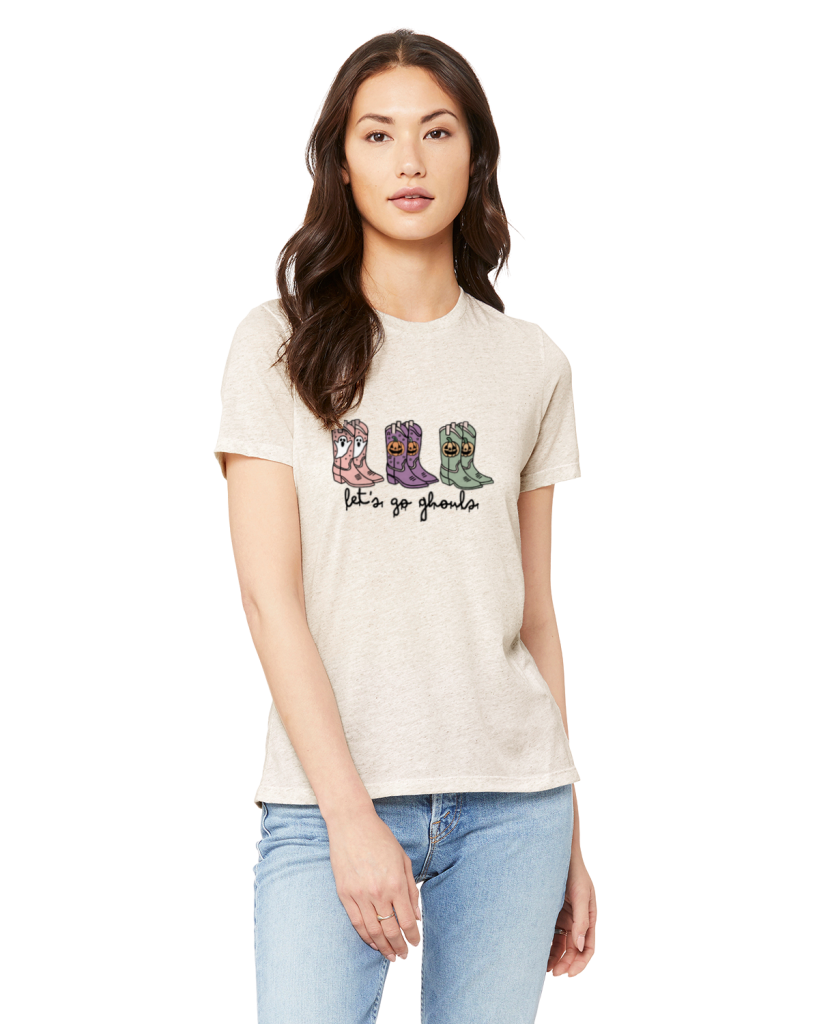
While I loved making the HTV shirts, some of the designs I found online were too intricate for vinyl. That’s when I decided to try direct-to-fabric (DTF) transfers. I ordered DTF printouts and t-shirt blanks from Jiffy Shirts, making some shirts as gifts while learning this new technique.

One of my best friends has a lot of chickens, and I knew she would love this Chick or Treat design. I made two of the “let’s go gouls” shirts, one for me and one for another dear friend I know from line dancing. At her recent coastal cowgirl bachelorette party, she’d given canvas bags that said “Let’s Go Girls” as favors, which made this design feel like a fun full-circle moment.
Thoughts on the Shirts Themselves
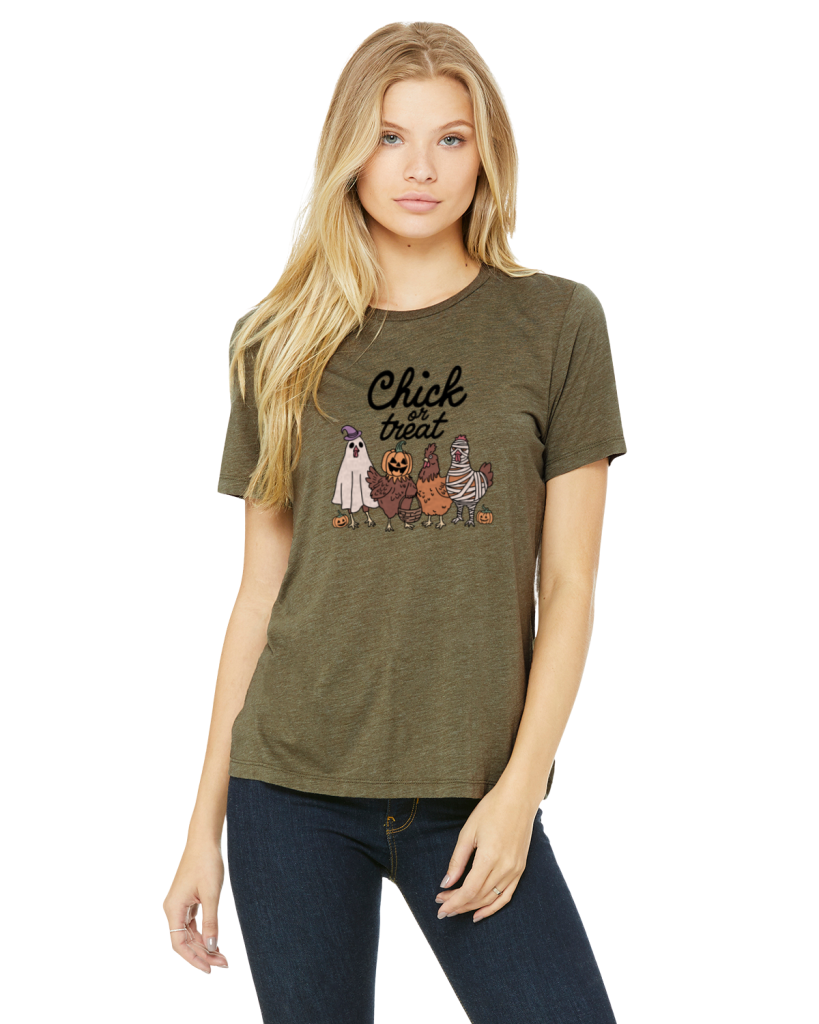
Olive Bella + Canvas 6413 (Jiffy Shirts) – The website mockup showed a slightly darker color, so it was a bit of a risk. In real life, I love the shade, and the design looks great on it.
Oatmeal Bella + Canvas 6413 (Jiffy Shirts) – I love the design, but not the shirt itself. From a distance, the color is exactly what I expected, but up close, the heathering is very noticeable and a bit textured, which competes with the design. The shirt is soft, but durability is TBD.

Universal Thread V-neck (Target) – This basic tee is soft and generally available immediately. In the past they’ve wore really well, but quality/craftsmanship has declined. Over the past few years, I’ve favored Banana Republic Timeless Tees over these.
Design Placement
For the latter shirts, I improved design placement by using t-shirt rulers I cut on my Cricut, following the T-Shirt Ruler Guide from Jennifer Maker.

I’ve caught a bit of a crafting bug lately, so it was really fun to work on a no-sew project using the Cricut machine that I’ve had for almost a decade. I might have started this for Halloween, but now I see the appeal and am tempted to make myself a shirt for every holiday. Christmas, New Year’s, and Valentine’s Day aren’t too far away!
Final Thoughts
As opposed to sewing, I’ve caught a bit of a crafting bug lately! It was really fun to work on a no-sew project with a Cricut I’ve had for almost a decade. I started this for Halloween, but now I’m tempted to make a shirt for upcoming holidays!
Working on these shirts reminded me hos much I love hands-on projects, and trying new techniques; there’s something magical about creating something uniquely yours.
Additional Resources
Videos I watched that helped me with this project:

- Don’t Make These Heat Transfer Vinyl Mistakes! – Jennifer Maker
- How to Layer HTV or Iron-On Vinyl on a Shirt | Step-by-Step Beginner’s Guide – Kayla’s Circut Creations
- How to Layer Heat Transfer Vinyl for Beginners – Design Bundles